
A Refresh for the Moore Heritage Home with Lynne Huras
- Oct 26, 2022
- 6 min read
Updated: Nov 10, 2022
By Amie Lalonde, Registrar & Assistant Curator
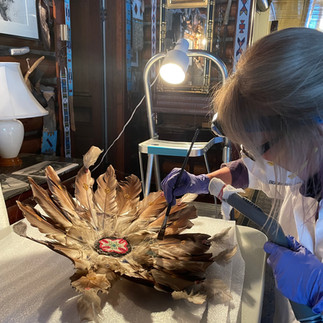
In early 2022, the Whyte Museum embarked upon cleaning various items in the Moore home (for a more detailed look at the Moore home, see my past series here). We brought in Lynne Huras, a Collections Specialist who has been cleaning artifacts since 2012 with the Luxton Foundation and Parks Canada. Lynne allowed me to shadow her during her four-day cleaning session, and gave me the opportunity to clean the largest animal in the house: a bison bust that the Moores won in a raffle!
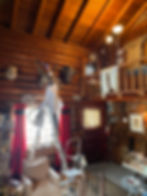
As a historic home, the objects within the Moore home have largely been left in-situ (that is, where they were when Philip and Pearl Moore lived there). This means that, despite our best efforts, the objects within the home are subject to more agents of deterioration than objects stored within our vault. The main objects of deterioration to be concerned about are dust and dirt, pests, light, and humidity. Thankfully, due to the dry Rocky Mountain air, humidity is less of an issue here than in some other places. Light is controlled by special window film and by keeping curtains closed when tours of the home are not going on. Pests are controlled with traps and monthly rodent inspections. Dust and dirt are created by human traffic, such as tours. More frequent traffic requires more frequent cleaning. Due to the pandemic, tours of the heritage homes had been paused, so few people had been in the homes since September 2019 – this has minimized dust and dirt compared to previous years when tours occurred three times a day every summer.
What's Dust Got To Do With It?
Why is dust a problem for artifacts? It is not just unsightly, but can cause damage due to its abrasive nature and can attract insects or mold.[1]
From the Canadian Conservation Institute:
“[dust] is a major concern for mammalian and bird specimens because dust gets trapped in delicate feather structures or enmeshed within the hair. Removing dust deposited on furs and feather surfaces is a delicate, time-consuming process that requires special equipment and training to prevent damaging the specimen. It may be impossible to remove it completely. Surface colours may also become obscured, and specimens may end up having significantly reduced interpretative and research value.
Oily bone or hide materials are also highly vulnerable because dust deposits will stick to the oils and darken the surface. Dust is typically abrasive and contains compounds that contribute to the oils' degradation, which in turn contributes to surface darkening and causes embrittlement.
Dust also often attracts pests, compounding the problems for hides, furs, feathers and insect collections already quite prone to insect infestation.”[2]
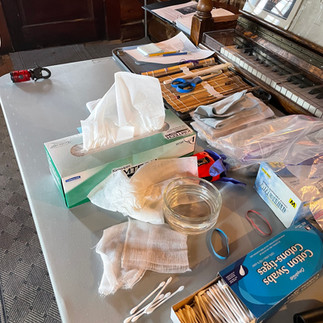
So how did we clean the artifacts? It is a slow, careful process that requires a variety of specialized tools, including a variable-speed vacuum with a natural hair brush nozzle, natural bristle paintbrushes, cheesecloth, distilled water, Q-tips, and lint-free Kim wipes.


Gallery 1
A Step-By-Step Guide
The steps to cleaning an artifact are as follows:
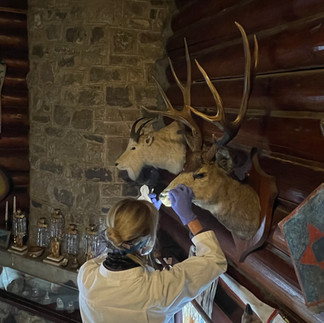
Visually inspect the artifact. Look for any cracks or issues with seams. Look for signs of pests (cobwebs, areas of feathers missing). Take photographs for reference.
For hardier artifacts like mounted taxidermy animals, use a vacuum to get the dust off.
Keep a cheesecloth over the nozzle of the vacuum to capture anything that comes off. This prevents you from losing any large pieces that may come off and gives the added benefit of seeing your progress in how much dust/debris comes off and how much fur from the animal is lost. Every time you clean an object, some fur, feathers, etc. will be lost. Conservation is all about striking a balance between cleaning to conserve the object and leaving it alone. It is important to handle objects as little as possible – some are left in place on the wall to avoid potentially damaging them by handling.
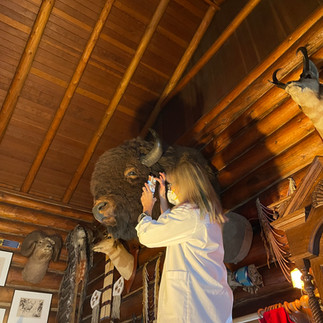
Don’t run the vacuum over the object. Place the nozzle, wait a couple of seconds, and then pick up and place again. It is very slow and methodical work. The bison is one of the hardier animals so you can move the vacuum around a bit after placing it to get at dust deep in the hair. For ungulates, hair is hollow and very easily broken so you have to be precise and gentle.
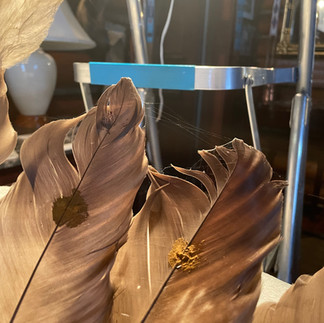
For more fragile objects, such as feathered headdresses, use a small animal hair paintbrush to slowly brush off dust. Then use a vacuum to clean the dust off of the brush.
Natural hair brushes (and vacuum attachments) are important because dust sticks to them just like it sticks to the animals. Natural fibres are all non-abrasive and won’t catch on the natural fibres of the animals and feathers.
For beadwork and other objects, how they are cleaned depends on how they are hanging and how stable they are. Assess the object’s stability first: if it is fragile use a paintbrush. Stronger objects, especially those mounted on hide can be cleaned with a gentle vacuum brush nozzle. Use extra care on drums or anything with paint to avoid cracking and lifting.
Use distilled water on Q-tips or lint free wipe to clean hard areas such as eyes, horns, and antlers. Do not rub, but place and lift. You don’t want to get the object wet, as that could invite mold and humidity, so sponge off the Q-tip after dipping it in water.


Gallery 2
While we were in the Moore home we were kitted out in full PPE - N95 mask, nitrile gloves, and lab coats. This was not due to the pandemic, but because taxidermy done before 1960 was done with arsenic and other toxic materials that can fall from the animal during cleaning. Later pieces of taxidermy can be treated with preservatives and pesticides and it is good to also protect yourself from dust. Gloves are always worn while handling museum artifacts.
Slow and Steady Progress
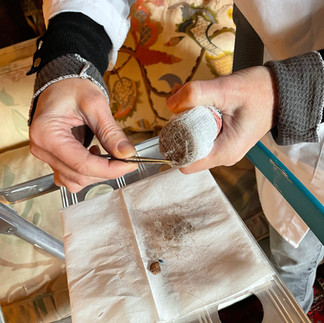
Lynne advised that it is important to trust the process! It is not always immediately apparent that you are making any progress so it is important to remember that you are getting dust off even if you can’t really see it. The cloth over the vacuum nozzle and the dirt on the wipes and Q-tips show how much you’ve removed and can be useful ways to gauge if there is more dirt with one cleaning over another (so you can investigate why that might be).
Lynne saved the bison for the end of the cleaning session so that I could have a go. Climbing up on the latter with the vacuum in tow, I was awed by the sheer size of the bison head up close. I started by going over the right side of the bison’s head, neck, and shoulders with the vacuum. Just as Lynne had said, it didn’t look like I was making much progress but when I checked the cloth over the nozzle before moving to the front of the bison, sure enough, there was a good amount of dust. The upper tuft of hair above the forehead produced even more – and cleaning the eyes and nostrils provided immediate evidence that I was indeed getting a lot of dust off. All in all, the bison took me about two hours to clean – my arms were definitely tired by the end!


Gallery 3
Lynne’s verdict after her week in the Moore Home: the objects are in very good condition. We did not lose much hair and had minimal cracking around the eyes and ears. Some objects could only be given a partial cleaning due to their fragility and difficulty removing from the wall safely. She gave us valuable insights to help us understand the amount and frequency needed for cleaning the objects need going forward and how our current practices are affecting the stability of the artifacts. Thank you, Lynne!
Want to visit the Whyte Museum heritage homes for yourself? Book a private tour on your next trip to Banff, or download the self-guided Banff Walking Tour App on Apple and Google Play!
Images:
Image 1: Lynne Huras cleaning a taxidermy artifact in the Moore home. Personal collection of Amie Lalonde.
Gallery 1: Left to right: tools of the trade; Lynne cleaning the nose of a deer (112.01.0009); Lynne photographing the bison (112.01.0007) before cleaning. Personal collection of Amie Lalonde.
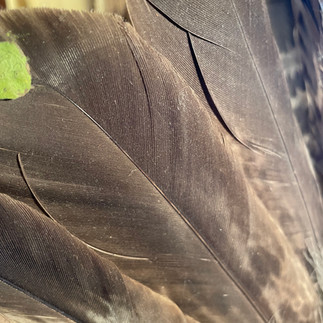
Gallery 2: Left to right: Lynne carefully using a brush to lift dust from a feathered dance bustle (112.01.0009); cobwebs between feathers; dust and dirt stuck to feathers. Personal collection of Amie Lalonde.
Gallery 3: Left to right: My turn to try cleaning the bison (photo by Lynne Huras); removing dust and debris from the cheesecloth on the vacuum nozzle; the final pile of dust, dirt, and hair that was removed from the bison. Personal collection of Amie Lalonde.
Sources:
[1] https://www.canada.ca/en/conservation-institute/services/preventive-conservation/guidelines-collections/natural-history.html)
[2] (https://www.canada.ca/en/conservation-institute/services/conservation-preservation-publications/canadian-conservation-institute-notes/care-mounted-specimens-pelts.html)